Roof

The roof was probably one of the most technical installs of all the building that had took place thus far. I had decided on a metal standing seam roof because 1) the roof pitch is very low 2) I like the aesthetic look of it 3) it’s relatively lightweight and 4) the solar can attach to standing seam without any through roof penetrations. I chose a snap-lock design over a mechanically seamed product because I didn’t want to invest in any seaming equipment, and while snap-lock designs generally down to a higher minimum pitch than mechanically seamed, I also planned to fill all the seams with caulkable butyl.

I had originally spec’ed out all the material from one company, who then refused to sell me the material because my order was too small. I then realized the importance of finding material that was actually obtainable - so I went to a brick and mortar roofing store who assured me they’d be able to get my small order from one of their metal suppliers.

That metal supplier was Taylor building products and I picked their Easy-Lock system because of the low rib height (at this stage I was still worried about overall height), and reversible panel design. I wound up not using the reversible panel feature though. Their standard flashing profiles did not cover as much of the eave and gable as I would have liked, so I decided to modify some of the profiles and added a common cleat that would anchor the lower end of the flashings without having exposed fasteners. The total BOM from Taylor is below:

  • 6x Easy-Lock 16" 24ga Panel in Kynar 500 Charcoal Gray with Accent Ribs

    Factory cut to 133.5" total length, no pre-notching

  • 12x 10' ELRECC-CUSTOM-JS (drawing attached) - Charcoal gray

  • 4x 10' ELEH-CUSTOM-JS (drawing attached) - Charcoal gray

  • 6x 10' ELGB-CUSTOM-JS (drawing attached) - Charcoal gray

  • 4x 10' ELREC-CUSTOM-JS (drawing attached) - Charcoal gray

  • 8x 10' ELSF (Support flashing, standard profile) - no color

  • 4x 10' ELSWC (Compensating Sidewall flashing, standard profile) - Charcoal gray

  • 4x 10' ELZC (Zee Closure, standard profile) - Charcoal gray

  • 6x 10' ELSR (Reversing Strip, standard profile) - no color

  • 6x ROLLS Double bead butyl tape

I additionally ordered the following from other sources:

  • Flanged Extra-Wide Rounded Head Screws For Metal, Square-Drive, Zinc-Plated Steel, Number 10 Size, 3/4" Long

    (Mcmaster 91655A245) (500x)

  • Screws For Joining Sheet Metal To Wood, Corrosion-Resistant Coated Steel, Number 10 Size, 1" Long

    (Mcmaster 98392A480) (200x)

  • 18-8 Stainless Steel Blind Rivets, Domed Head, 3/16" Diameter, For 0.126"-0.25" Material Thickness

    (Mcmaster 97525A490) (100x)

  • Premier XtraBond 1500NS Butyl-Caulk - XB1500NS (10x)

  • Sharkskin Ultra SA | Underlayment | 48" (one roll)

  • Sharkskin Ultra SA | Underlayment | 8” (one roll)

I made a drawing of all the critical interfaces:

241004 - ROOF FLASHING DETAIL.pdf

And of the custom profiles listed in the BOM above:

241003 - ROOF FLASHINGS, INDIVIDUAL PROFILES.pdf

First step was to put the 8” sharkskin down on the lower eave, attach the cleat, put the drip edge over that, then layer the entire roof with the sharkskin underlayment. Then the sidewall support flashings went in, and then the panels in the center roof (higher pitch section) went in. I won’t go into too much detail on the procedure as most of it is captured in the first drawing linked above as well as on the Easy-Lock product page in their installation manual.

After the center panels were in, the sidewall flashings went on as well as the zee closures and high eave peak flashing in the center section. Then the cleats, drip edges, and sidewall support flashings went in on the top roof sections (lower pitch). Panels were laid in these two sections, and then the gable and high eave flashings went on in both sections. We did not end up using the reversing strips to reverse the panel direction mid roof.

Most of the work was fairly manageable with one person, but two people were definitely needed for the underlayment install (think of it like trying to apply a piece of 4 foot wide, incredibly sticky tape in a straight line without bubbles or creases), and installation of the gable and high eave flashings. The actual panel install could be done singlehandedly.

Some new, specialized tools for this stage of the build were:

  • Crescent WISS Straight, Left, and Right cut tin snips

  • Crescent WISS 3” hand seamer

  • Malco HP18KR, RedLine Hole Punch

  • Malco TurboShear

  • Stanley MR33C Medium Duty Riveter

Exterior Finishing

Finishing the exterior took A LOT of time - as of the end of December I’m still not fully wrapped up with it, but moved on to other tasks after the majority of it was done. Most of August and September were focused on exterior finishing.

Gables and eaves

The first items to install were the gable and eave trims. I had mocked up these interfaces and how the soffit was going to look, shown in the photo on the right.

I had seen a house with a cedar soffit and really liked it, so tried to make the most of the rather small soffit I had because of the small roof overhangs to keep overall width in check. I used these 1/4” cedar tongue and groove panels that were originally meant to be closet liner, which were fairly affordable from Home Depot. These slotted into a dado in the actual gable/eave trim, which is a 1x8 pre-primed finger joined pine trim board (also from Home Depot). The 1x8 gets ripped down to 1x6-1/2”, and gets installed dado side down with regular wood screws underneath the roof zip panel, which was installed to be proud of the sub-fascia by 3/4”. This overlap was then tapped with ZIP tape, extending down the gable/eave by about 1-1/2”. I used the offcut of the rip of the 1x8 to create the backer strip into which the cedar soffit would get nailed into, with the other end being slotted into the dado. I used 3/4” stainless 18ga brad nails to attach the soffit to the backer. There will then be a 1-1/4” inch thick frieze board to cover those nails and manage the transition to the siding from below.

The cedar got a coat of stain before being installed.

Rainscreen

While researching siding, I found that a rainscreen was best practice to put under the siding to let any moisture back there dry out. Frankly, it probably wasn’t necessary with the house going to LA and my siding being lap siding that allows more air movement than for example, metal siding, but it gave me more peace of mind and seems like a good idea in principle. I decided to accomplish the rainscreen using furring strips as opposed to a drainage mat because I like the rigid dimensionality of lumber as opposed to a mesh type product. I chose 3/8” doug fir ply to make the furring strips after watching a Jake Bruton video about rainscreens, though on a bigger house without weight considerations, a full 1x3 or 1x4 might be better, especially if there is exterior insulation. We ripped the ply down to ~2-1/2” when placed over the studs and 1” when it was being used to “frame” a window. We installed the strips with #10 3-1/8” wood screws into the studs when applicable, and #8 1-1/4” screws when it wasn’t over a stud.

To close out the bottom of the rainscreen gap, I decided on the Cora-vent SV3 plastic vents that have a bug screen. We installed these all around the bottom edge of the house, and above the windows to let water drain out onto the drip cap. We also installed a tiny 3/8” strip horizontally over the Cora-vent to create the angle on the first piece of lap siding.

Window and Door Trim

I spent a lot of time thinking about, and eventually building, the window and door trim. Because of the rainscreen and siding dimensions, and I needed my trim to be 1-1/4” inch thick to be flush or proud of the siding. There weren’t any stock profiles that I liked and could get quoted quickly, and Home Depot didn’t have much selection. I decided to design and make my own - out of redwood.

The top and bottom profiles have drip cuts to prevent water from rolling back to the window, and the bottom profile is suspended off the siding by the two rails on either side to make sure water can’t puddle there. In all, for each window, there are 5 parts since the top rail and drip cap are separate because they can’t both be nested into a single 2x4.

To make these profiles I used mainly 2x4 and 2x6 redwood heart (from Home Depot) and joined and planed them to thickness at the makerspace before ripping on the table saw.

After making the profiles, I assembled them with glue and countersunk wood screws (all pre-drilled), and then filled in the screws with wood putty before giving everything a light sanding. The plain wood profiles looked so good I considered just staining them instead of painting. If I could do it again I would strongly consider that and use hidden joinery instead of the screws.

I had originally intended on spraying all the trim profiles and built a rudimentary spray booth, bought a used air compressor, and bought a harbor freight HVLP gun. This turned out to be a terrible idea. The spray booth was poorly ventilated so I wound up getting paint all over and couldn’t see through the cloud, and compressor could barely keep up and became molten lava after 10 minutes or so, and my air-water separator was so measly that it instantly saturated and I would blow a big drop of water out of the gun every 10 seconds of spraying or so. I quickly abandoned the spraying and resigned myself to applying 1 coat of primer and 2 coats of paint by roller. This resulted in probably ~16 hours of work, de-racking the trim, painting one side, re-racking, letting dry, then repeating for 12 assemblies. I used Insl-X tannin blocking primer since it is redwood, and for paint Ben Moore Aura mixed to Behr Night Blooming Jasmine (YL-W10). I bought 4 gallons and used 3 of them. After a few months the redwood tannins are already bleeding through, so either the primer is bogus or I didn’t roll it on thick enough (I only did one coat and they recommend two for high-tannin woods). Fortunately it is bleeding through at the rings so it makes the trim look more woody, which I actually like (for now).

These were shimmed around the window to get it all lined up (there’s a 1/8” gap all around to the trim), and after a test fit, caulking applied to back and then they were fastened into the sheathing with wood screws. I’d recommend using fewer longer/bigger screws as opposed to finish screws, because the finish screws don’t have the boring feature that pulls the two members together.

I also made some corner trim out of redwood that were installed at the corners of the house.

J-Blocks

All of the through penetrations (vents/wires) or exterior mounted devices (trailer lights, porch lights) are attached to the wall through junction blocks (J-blocks). These go on before the siding and make it a lot easier to mount and seal stuff that goes through the wall.

I made these 1-1/4” thick (just like the trim) out of redwood scraps leftover from the trim build. I also couldn’t find a good profile for the drip cap (to kick water out over the block) so I bought some .032” aluminum sheet and cut and bent the profiles on the shear and press brake at the makerspace. I sprayed them with Al primer and then painted them the same blue as the siding. The blocks were primed with the same primer as the trim, and also painted blue, then attached to the house with wood screws (from the inside for all the ones after the one in the picture below). The caps were installed over the top of each block, nailed into the sheathing, and a piece of ZIP tape prevents water from going behind the cap. The gaps to the siding around the J-blocks will get caulked and painted.

Siding

Siding was a big decision - and required a lot of thinking, quoting, and research. I originally wanted this nickel-gap cedar profile from LPSmartSide, but it turned out to be basically unattainable on the west coast, and was a 3/4” thick profile so would have been very heavy. I also considered natural wood, but that turned out to be cost prohibitive. We decided on the cedar texture 38 series lap siding from LP because 1) it’s cheap 2) it’s thin and light and 3) stocked and available (even at Home Depot). All-in the siding cost ~$1700 for the entire house which I think is fairly unbeatable in a wood product. The cedar-texture turned out to be good decision I think because it hides a lot of imperfections in paint and waviness in the texture. I got it quoted from Home Depot and a local lumber yard, and I thought Home Depot was giving me a good deal but it turned out one was for 12’ lengths and the other was 16’ lengths in the same total quantity of pieces. This turned out to be a decent mistake to make as I used 90% of the material (I would have underutilized the 16’ order) and the 12’ pieces were much easier to handle.

We decided on Infinite Deep Sea from Behr (S500-7) but had it mixed in Ben Moore Regal Select (flat finish) at a local store. The mix was ok but the color was not the exact same as the swatch - and I was originally down on how it looked on the house but have since warmed up to after the green of the ZIP was fully covered in siding. I bought 12 gallons and have only used 7 since I originally planned to paint the back of the siding, but LP says not to. The flat finish does get a little dirty, but it hides touch-ups super well which I like.

I spent 12 hours pre-painting siding with a roller.

We then marked out the siding locations on the house which was an awesome tip from a video from Kyle at RR Buildings - look up “story pole method”. We had to use the laser to get around some odd sections that were unmeasurable, and then used the chalk line to connect the marks to complete the “pre-marking”. The siding get’s attached to the house with 1-3/4” 0.110” ring shank stainless nails. These were probably a little big in diameter for the job, but this is what LP says to use if you are doing furring strips. We put in two nails at every furring strip location. I was originally renting a roofing nailer (these nails need a roofing nailer as opposed to a siding nailer since they are so big), but wound up buying a used DeWalt roofing nailer which was a great decision. The pneumatic one I rented had a feather trigger that would often overhsoot, and was very sensitive to the tank pressure. For both the electric and pneumatic nailers we often had to bang in proud nails with the hammer. At the butt joints we put a “sticky-note” of bear skin, painted the same blue, to kick-out water down to the next piece of siding. This allows the butt joints to go un-caulked in perpetuity.

At J-blocks and windows there were always some weird cuts to get around the block but continue the piece of siding. These cuts consumed a lot of time, especially when the process was measure-cut-test-fit-cut-install. We painted all cut ends.

Finishing touches

I made a small deck out of redwood offcuts from the trim build where the heat pump will go, and did an “extended soffit” under the overhang. Both of these turned out really good and added a warm wood touch to the blue.

10 Lessons Learned from 10 Weeks of Building

Some things I’ve learned, or at least have had reinforced, over the past roughly 10 weeks of building.

Take care of yourself

  • Getting hurt isn’t admirable nor productive. Small, stupid injuries can and have ruined days of work.

  • Rome, nor a house, were built in a day, so pace yourself

  • Wear your PPE - you want to come out on the other side with eyeballs, hearing, and lungs intact. I recommend getting some decent over the ear protection and a decent respirator.

  • Wear sunscreen!

Things are done the way they are for a reason

  • It’s your job to figure out why, and where to do it differently. Doing things the same way they have always been done without understanding why is at best a missed opportunity for improvement and at worst is a misapplication of a “standard” method.

  • Good examples:

    • Keeping studs 16” or 24” on center keeps your sheet goods and rafters lining up every time - makes things go a lot quicker and reduces odd cuts and fitments that chew up time. I regret not putting more effort into keeping things 16” on-center from the beginning

    • The screw vs. nail story is a long one, but nails will always be cheaper and faster. You lose opportunity to fix previous work, ability to pull pieces together, and pull out capability, all of which I came to highly value and I was glad I framed with screws. Sheathing and siding though - nails.

    • Exterior trim comes in pre-milled and sometimes pre-primed profiles - this speeds up install and paint process considerably. I made all my trim profiles from redwood 2x4s (jointed, planed, cut after purchasing) and primed and pre-painted all of the window frames - this took an obscene amount of time but the end product turned out great.

    • I pre-painted all my trim and siding so I have no painting that needs to be done on the house - this took a while but I think the final result is better - tight lines and no drips on windows or other parts of the house.

Fixtures and shop improvements pay themselves back in high multiples

  • If you can think of more than one use for a shop fixture, it’s probably worth building. My toolbox, large assembly table, miter saw station, and table saw infeed/outfeed are good examples. That 2 hours 5 months ago probably saved 10+ hours over those same months

  • The same goes for tools - if a good tool gives you significant speed or quality improvements, it’s probably worth it (my 18ga brad nailer)

Pull your own materials where quality matters

  • Lumber deliveries are risky because they are pulled by folks who don’t care about your project the way you do. Pull your own wood and take the time to find nice pieces. Tiny projects require increased levels of detail in all aspects.

Create your own deadlines

  • Ask people to help you or rent a tool in advance to hold yourself accountable to timing

  • Going along the lines of 1), schedule days off and/or trips - it gives you deadlines/hard stops to work towards

Make mock-ups

  • The first time something comes together it generally never looks or works quite right

  • Spend a small amount of time and money on a scaled down version or sample to confirm the way you are doing it is the easiest, fastest, or highest quality, and adjust for V2 (the real deal). My mockups of the exterior trim, soffit, and siding colors paid dividends later on.

Overorder and overbuild

  • The extra cost lost to extra material is likely less than the time lost to being held up from not having material on hand.

Talk to people in person

  • I spent a lot of time on the computer specing out parts/designs only to learn they weren’t easily attainable or were below minimum order quantities. Local stores/shops will have a known list of regularly stocked parts, and at minimum can tell you what they can or cannot get.

  • Talking to someone in a store or local shop can get you answers to questions it might take hours to Google (but do your research first!)

Pitch your roof steeper

  • Low pitch is a headache - my interior headroom turned out fine and I could have gone to at least 1:12 on my low pitch sections. I think 1:12 is the lowest I’d go in the future.

Last but not least - have snacks and a source of caffiene on-site

Sheathing and Window/Door Install

With framing complete and signed off from the inspector, sheathing was up next.

The sheathing is all ZIP R-Sheathing R-6, which is roughly 1/2” OSB with the ZIP system Weather Resistant Barrier (WRB) on the outside, bonded to a roughly 1” thick piece of poly-iso foam. This gives me a continuous thermal barrier on the outside of the house, adding directly to the effective R-value of the inter-stud insulation and wood studs. This puts the house at an effective R-value of roughly 19, which is taking into account the comparatively low R-value of wood detracting from the higher R-value of the rockwool insulation that will go between the studs.

One downside of the R-sheathing is the higher fastener schedule demanded - Huber (manufacturer of ZIP) requires a 4 inch edge and 12 inch field nailing schedule, which comes out to somewhere near 100 fasteners per 4x8 panel. With construction screws running ~$0.2 per and taking 20+ seconds to run down, nailing was the way to go for the sheathing. We rented a nailgun for $200, purchased $200 in nails, and were able to hang 44 panels with 3000 nails in one week. I was able to borrow a Track Saw which proved immensely useful for cutting the panels down to non-standard sizes when needed. I recommend a high quality circular saw or corded version as the foam tends to pinch the blade and bog down the saw.

With 2 people we stayed busy with decent efficiency with a procedure that went something like this:

  • (1 person) Measure gap/space to get the panel edge to sit on a stud

  • (1 person) Cut panel to size with track saw

  • (2 people) Hang panel and use clamps/screws to tack it into place

  • (1 person) Nail panel according to fastener schedule

We also notched the rafters with a jigsaw to get that thermal barrier all the way up to the roof, and cutout the window openings with the jigsaw (these were later trimmed using a router).

With the sheathing installed we could seal the seams and prep the rough openings.

For seam sealing we used the following products:

  • ZIP Flashing Tape (3.75”) for seams

  • ZIP Liquid Flash for all over-driven nails/fasteners

  • Prosoco R-guard Joint and Seam Filler for the rafter-panel-roof cutouts

And made sure to shingle all the tape (generally working bottom up, horizontal seams before vertical).

Prepping the rough openings was a little more involved. We roughly followed these steps:

  1. Trim the sheathing to the frame using a flush trim bit with bottom bearing (this made an immense amount of dust, another downside of the foam-backed sheathing)

  2. Lay a flexible sill pan using ZIP System Flex Tape (6” wide). For doors I additionally had 22 gauge stainless steel sills pans made that laid over the flex tape.

  3. Apply flashing tape to the sides, folding around the frame to create an air barrier between the frame and sheathing.

  4. Apply a head flashing tape, shingled over the side tapes

To actually install the window, we followed this process:

  1. Check floor in window vicinity for level - level trailer if not level

  2. Tape two shims in place, thick side out (remember that the sills are sloped 4 degrees out at the framing stage)

  3. Place window in opening, center side to side, check level on top of window, check diagonals for square. Adjust shims as needed. Trace window flange onto side and head flashing tape. Remove window.

  4. Apply continuous bead of sealant (DAP Dynaflex Utlra - Black) inside the traced line around sides and top, but not the bottom to allow for drainage should water get back there.

  5. Re-install window. Check level again, fasten screws through the flange (we used GRK #8x3-1/8” cabinet screws which have a large pancake head that works well with the flange). We fastened through all top and side holes but left the bottom at every-other.

  6. Apply side flashing tape, folding 1/2” onto the window frame. Apply head flashing tape, folding 1/2” onto the window frame.

A drawing for the sill pans I had made are below - they were not cheap but it feels good to have a solid pan underneath the doors as insurance to water intrusion. The sill pans shown in the photos below are just placed in as a test fit before the flexible pan and side flashings were installed, after which the pan was permanently attached.

240729 - SILL PANS.PDF

One detail that I regret not doing is boxing out the door openings using solid wood instead of having the sheathing extend to the opening edge as I had it. This could have been be easily accomplished on the sides of the opening during framing by using a 2x6 jack stud ripped down to 5” (3.5” frame + 1.5” sheathing). The solid wood box gives doors with a nailing fin a better structure to mount to, but more importantly allows longer screws to be installed through specifically the top hinge going directly into the framing. On the back door, these screws went directly into the foam, doing nothing. On the big front door, I wound up trimming away the sheathing and installing ~1.5X1.5” wood strips on either side of the door.

Installing the doors was nerve-wracking. The back door is fiberglass and pre-hung, but without a nailing flange, so we had to do a lot of shimming to get the jambs straight, plumb, and the door closing with consistent clearance. However, we were able to lift and install it with two people and it turned out pretty good. I taped the gaps between the opening and jambs just like the window, being careful to limit the extent of the tape onto the jamb as part of the jamb will be visible after exterior trim. The back door opens into the bathroom and thus has frosted glass, and it diffuses light very nicely into the space.

The bigger front door required 4 people to lift and install, but fortunately had a nailing flange to enable tacking it into place easier. I think the door fits and swings well in the opening, but some adjustments need to be made to the latching hardware to get it to latch consistently without missing the strike plate (it is a multi- point locking door, so there are a total of 4 strike plates between the sill and head jamb). Since it had a nailing flange we were able to apply sealant to the opening just like the windows, and did the same taping strategy on the sides and head.

With the whole house sealed (except the bottom), and R-6 insulation from the sheathing, it started to get pretty toasty inside! I took this as a good sign as there was no inter-stud insulation yet installed, and it wasn’t even that hot out. The next steps are exterior trim and siding, roofing, and then plumbing/electrical.

Interior Framing

There were a few interior walls and floors that needed to be constructed. We used the same methods as the exterior walls.

The largest floor is the sleeping loft floor - which is 2x4 framed with one side sitting on top of a wall and the other attached into the exterior wall with a ledger board (like a deck might get installed). We used a combination of 2x4 open and concealed hangers, after which we laid the same 3/4” Advantech underlayment as the main floor, with PL400 adhesive but regular wood screws as opposed to wood-metal.

There is also a landing area at the end of the stairs, adjacent to the sleeping loft floor that we followed a similar process for.

The larger wall pictured will eventually house a pocket door frame, hence the absence of studs in the middle of it.

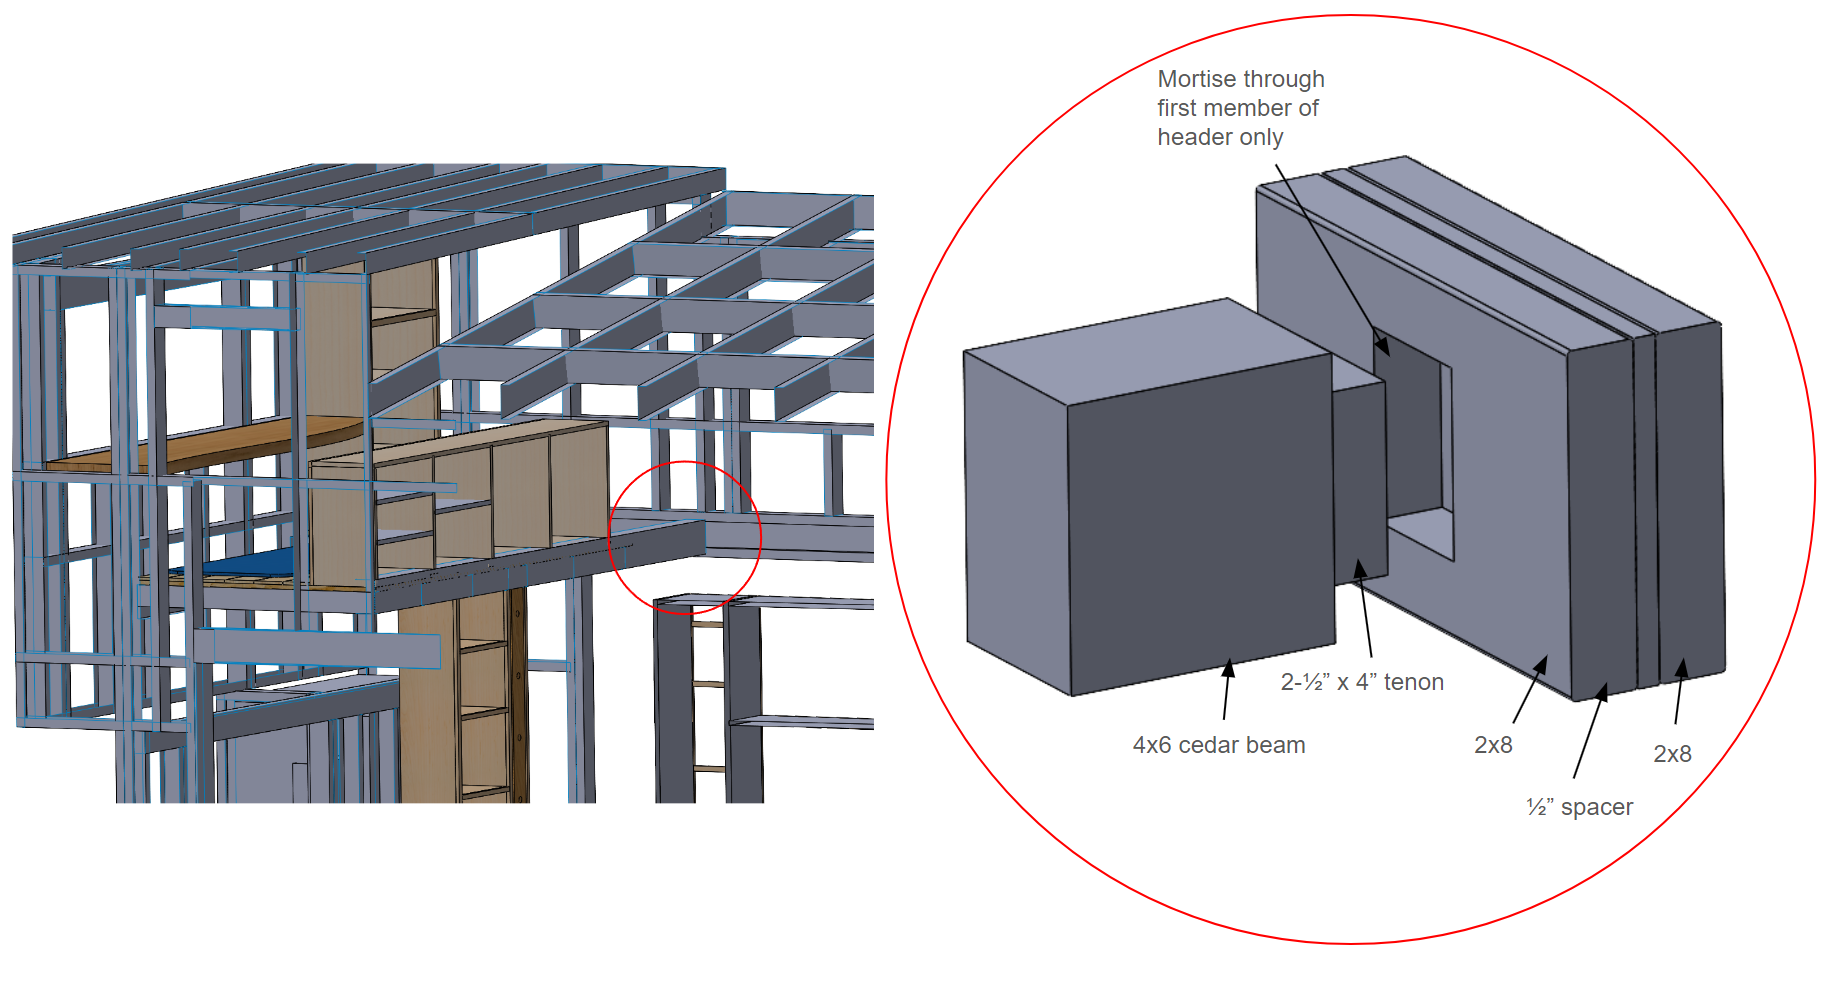
We also have a floor on the other side of the house that forms the office loft. This floor design was originally also poorly designed by me, which was re-designed. The new design utilizes two transverse beams that attach to exterior walls - one beam is 2x6 Fir (framing lumber) and the other is 4x6 western red cedar (appearance grade - it will be exposed on two sides). In the pictures below you can see the 2x6 towards the front of the house, sitting on it’s own “jack studs” in the exterior wall, and the cedar beam, one end which attaches similarly, and one end which is mortise and tenoned into the large door header. The floor frame was then completed with 2x4s 12” on-center using 2x4 hangers. There is an opening in the framing on the RH side where the ladder will go to allow access to the loft.

That is all the main rough framing done! On to sheathing

Exterior Framing

With underlayment set it was time to frame!

My Dad was onsite for 2 weeks helping out, which enabled us to finish 4 (5 if you count the front as two separate) walls and raise them in one week, leaving another week for roof rafters and internal walls. The planning that went into framing paid off - we were able to cut every single member to designed length and screw everything together with minimal adjustment needed to keep everything square or within dimension. Those designed lengths were captured on these drawings:

240626-FRAME-ASY.PDF

Some details not captured on the drawings:

  • We cut the studs underneath the sills at 4 degrees sloping out from the inside - to create a slope on the sill as the windows will be installed with “drainage method” (leaving the underside intermittently sealed as to allow any water that gets behind the window to drain out)

  • The drawings were originally for a pre-fab steel stud design, which I pivoted away from and as you can tell from the photos, the design is build on-site wood. There is some blocking/horizontal members on the drawings that could exist in a steel stud design (they can be notched and intersected) but can’t exist in the wood frame

  • The two headers for the two 2x5 windows in the right hand wall don’t sit flush with the top plate - they are 3/8” below it on the drawing. We wound up using the headers as the top plate by moving them up 3/8” and lengthening all the members below them.

  • The front overhang for the office loft footwell is poorly designed in the drawings. More on that later.

  • The office loft floor design is somewhat bad - this was re-designed “in the field” - also more on that later

  • We wound up shifting the kitchen window up 3”

  • We edited the bathroom toilet nook header to allow more headroom in that space

After we fabbed all the walls on the ground, I recruited some hands to help raise them. The LH and RH walls were probably 1000-1200 lbs each. We first wheeled them horizontally into place, and then used a block and tackle mounted to a warehouse ceiling beam to raise them upright. We then lifted them into the dollies shown in the photos below. We had a total of 4 people manually moving the wall, and two people operating guy wires to keep it from tipping over. We then pushed the walls up a ramp onto the trailer and moved them the final foot or so into exact place with hand-power and mallet. We had some temporary “stantions” in place that we could pivot up and quickly screw into the wall to give it some diagonal support - 4x per long wall.

We then attached the frame to the trailer using tie down brackets and bolts - a detail of which can be found in the drawings. We started with the LH wall and then did the rear wall, RH wall, and then front lower wall.

Now what about the front top wall? I mentioned earlier that the overhang support was originally poorly designed (by me) - so I redesigned it and got it approved by my inspector. We then implemented the below design and it turned out pretty clean.

With all the exterior walls installed it was time to put the roof rafters on (we actually did the interior walls first but I’ll cover that in the next post). The roof has two angles - 1.5 degrees and 9.5 degrees. The shallow slope roof is reserved for the loft areas and is framed with 2x4s 12” on-center to allow for maximum headroom, while the steeper slope (LA Code requires >50% roof area is pitch 2:12 or greater) is 2x6s 24” on-center. The length of those rafters is captured in this drawing:

240708-ROOF-JOIST-TO-TOP-PLATE-DETAIL.PDF

We built a router jig to get the notch in the rafter perfect every time.

After installing some blocking between rafters, the exterior framing was complete save for the sub-fascias and barge boards on the end of the rafters.

Trailer Pickup and Underlayment

I rented a truck and drove down to San Bernardino where I picked up the trailer that I ordered from Tiny House Basics (A company called New Trend Custom Trailer actually fabs the trailer). It’s 28’x10’ wide, with 3x 7k axles for a total of 21k GVWR, electric brakes on all axles, squared off fenders, and a custom bumpout on the front where I plan to put utility stuff.

Getting the trailer back to SF took 11 hours - combined with the 55 mph limit for towing, I had to pull an oversized permit (CalTrans took 3 days to process it, delaying my departure from San Bernardino) and take a non-standard route. The 10 foot wide trailer took up most of the lane - making staying centered extremely nerve wracking. At some points I had to just commit to taking up two lanes, especially in construction zones.

First order of business was underlayment. We used 3/4” Advantech X-factor underlayment, which is tongue-and-groove and has a nice “crust” on the OSB that mostly just puddles water instead of soaking it up. We had to pre-drill the trailer and countersink the holes before screwing in #12 metal to wood screws, as the trailer would strip if you tried to pull the head of the screw into the underlayment with torque alone. Screws were roughly 16” on center to intersect with the frame members. I bought 210 screws and we used every single one of them to attach a total of 9 full 4’x8’ sheets (More full size panels were used as the last “row” of half-width panels all needed to have a tongue on them). Before screwing we prepped the trailer surface with Acetone and laid a fairly thick bead of Loctite PL400 subfloor adhesive (claims to bond to metal and coated metal). Julian and Tapan were onsite and we were able to finish the entire deck in one day.

Warehouse, Toolchest, Lumber, and Small Doors

Lots of updates over the past few weeks - I’m slowly but surely moving into the rented warehouse space, bringing all my tools (also acquiring new ones), building workbenches, and laying out the space.

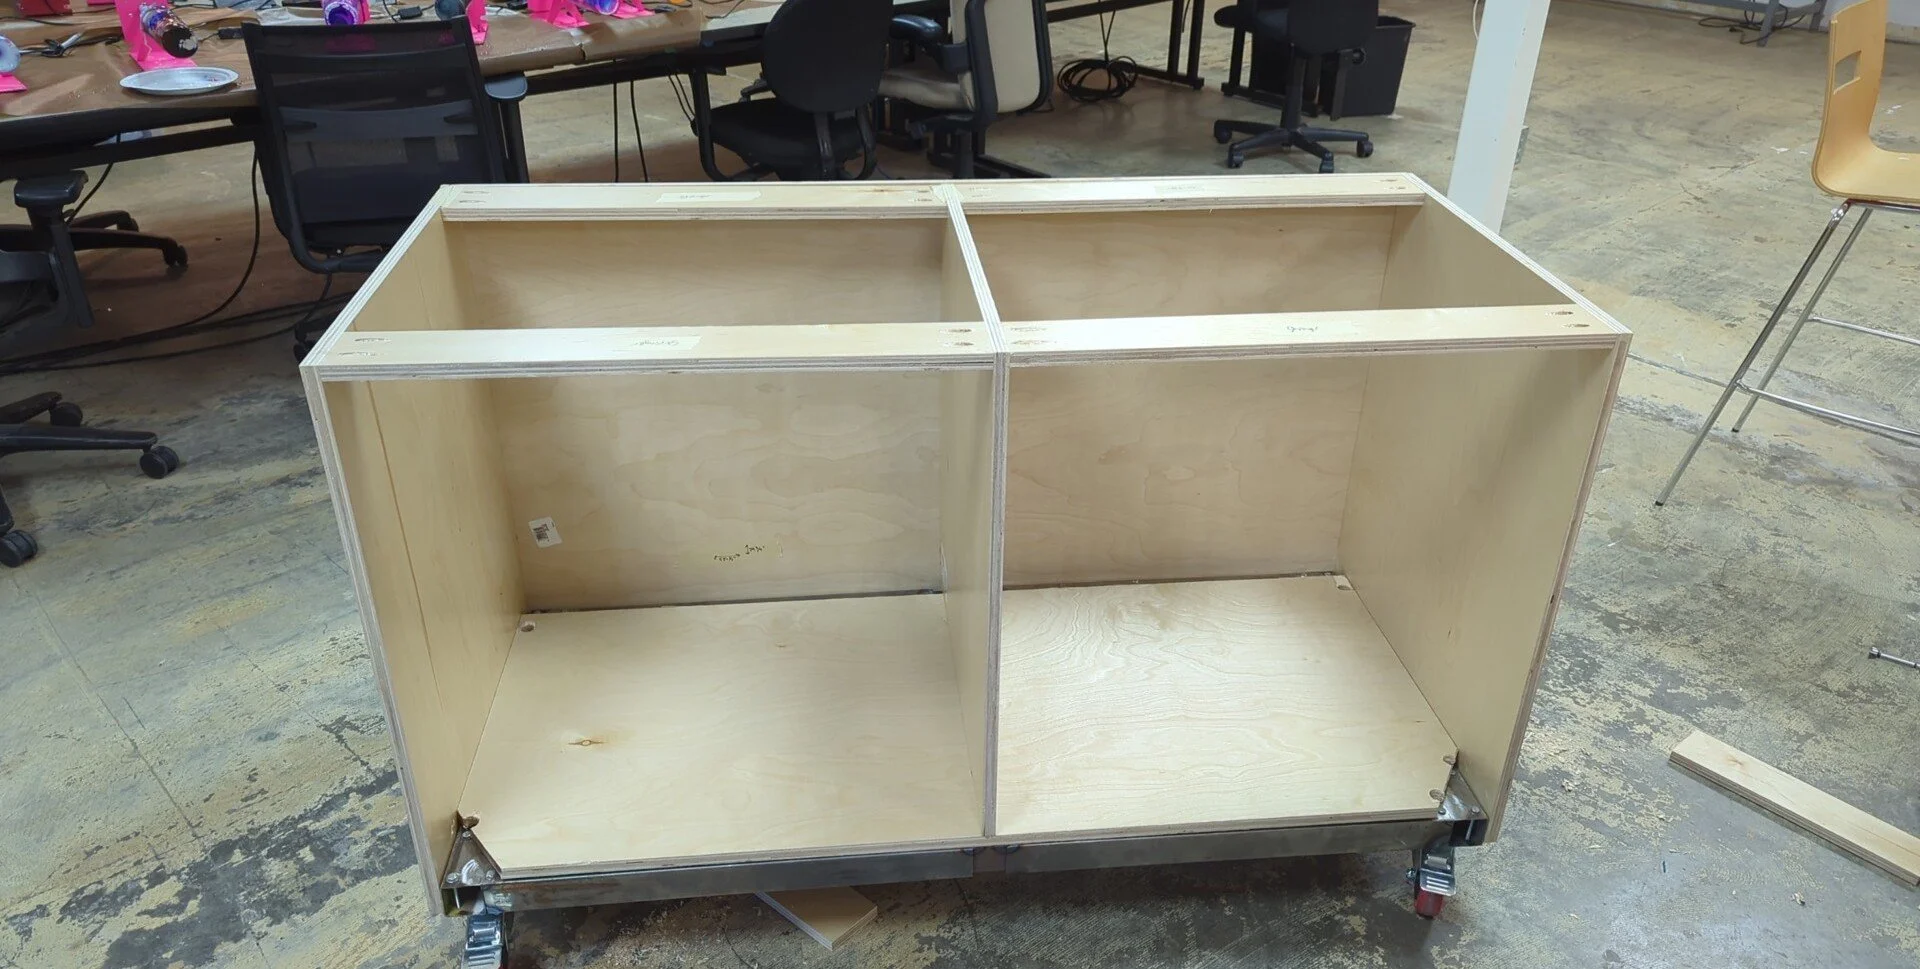
I’ve been working on a toolchest to store my tools (for the past few years they have been kept in miscellaneous organizers, bags, and cardboard boxes). The whole reason for the toolchest was to build a cabinet with drawers such that the cabinets in the tiny house wouldn’t be the first cabinets I ever built. I welded up a metal frame at the makerspace and then built the carcass out of 3/4” veneered ply, and used mainly 1x4 select pine for the drawers. The face frame is also pine. I got a butcher block slab relatively inexpensively from LL Flooring. I still need to finish the drawer fronts.

Lumber was delivered on 6/14 - framing lumber, roof lumber, ZIP Panels, and underlayment. This should be enough material to frame and sheath the entire house and get it ready to receive windows and doors. I ordered different lengths and quantities of 2x4s, 2x6s, and 2x8s, all No. 1 & BTR grade Kiln Dried except for roof joists which were Select Structural grade. Some of the delivered lumber was not the right grade, which I’m hoping the yard will quickly remedy.

Last but not least - why is there a wooden, rickety looking excuse for a trailer in the space? The warehouse advertised 16’ roll up doors and 16’ clear height ceilings, neither which turned out to be true, and I also didn’t verify until after signing the lease (lesson learned). The door is 13’6” and the lowest fire sprinkler pipe is 13’6”. The house when complete is 14’ tall, leaving 6” + 2” clearance to find in order to get it out the door. While not finalized, I think a combination of smaller wheels for this specific operation, some clever raising and lower of the tongue, and leaving the rear section of roof and envelope off until the house is outside can do it.

There is also a concern of getting it out of the door and into the main driveway without hitting the fence at the property limit. This is where the wood trailer comes in - to validate this operation.

It works, but barely. A truck would not be able to get that close to the fence, so some hitch dolly would need to be used. There is definitely some more thinking that needs to be done on this, but the “too late” point doesn’t come until the roof sections are on in terms of height.

Design Review 1

As the tiny house transitions from the design to build phase, I wanted to assemble some documentation on the house to get some more qualified eyes on the design, and gather feedback from friends/family (and to also show them that the project I never shut up about has some foundation behind it!).

The attached document is the culmination of a few years of thinking, designing, and iterating, and is meant to capture a lot of the high level decision making. There is still a lot to figure out, but will at least be guided by these decisions.

To note, I messed up the math on the costs of the different insulation technologies - I was using the cost of an 8-pack of Fiberglass Batt with the area of a single pack, so the real cost is 8x lower. This puts Batt cheaper than XPS. Additionally, Rock Wool is in a similar price range as Batt and has some additional handling and fire resistance benefits, so the insulation question is still somewhat open.

Some of the battery energy math from the previous post is duplicated in this document.

To date, the trailer, windows, and doors have been ordered, and the build space is rented.

240603 - Design Review 1.PDF

Battery Energy Calculation

The tiny house is solar powered but there was still an open question as to whether all electric loads (there is no gas) could be powered with sufficient up-time with solar and a battery. The solar layout is limited by roof size, and while an external array could be built, the roof area is only currently planned place for solar. The question then becomes, how big does the battery need to be to absorb the transient demand loads - as solar peaks at midday but generally demand peaks between 4 PM and 9 PM.

The attached presentation overviews the whole-house electrical model and presents a methodology for determining how big the battery should be. This model was assembled and run over the course of 2022-2024.

Tiny House - Why and Work Done to Date

Over the past 4-5 years I’ve been developing the ideas and desires that have ultimately led to wanting to go tiny with my physical living space:

  • Eliminate “operating” carbon footprint by 2025

  • Own my housing destiny on a manageable time scale and expense

  • Reduce dependency on centralized systems (e.g. the electrical grid)

  • They are super cute and seem like fun to build

In the early stages of design, I wanted to build it in a 20’ shipping container, the details of which can be viewed in the gallery below. Between meeting my partner (needing a little more space) and learning more about the legal side of living tiny, we ultimately decided to pursue a different route.

We chose to build a tiny house on wheels, as it seemed we could balance cost, location flexibility, size, and fit within an existing framework of laws and regulations that wouldn’t be impossible to navigate. Additionally, past the fact it is built on a trailer, many standard building methods (e.g. framing, plumbing, electrical) still apply so we don’t need to reinvent the wheel and can use common off the shelf building materials.

So far, we’ve completed the following, some of which I’d like to go into more detail on in future:

  • List of requirements. Functional requirements for the space on a high level.

  • Rough layout. External and internal dimensions, placement of entry points, windows, major appliances, and furniture.

  • Rough thermal sizing and design matrix of insulation technologies, energy usage, and cost. Heating/cooling efficiencies and energy usage.

  • Power generation and energy storage investigation. Rough energy generation and consumption models.

  • Electrical storage and distribution architecture.

  • Water distribution architecture.

  • Appliance size and technology. Refrigerator, stove, oven, dishwasher, washer, hot-water heater, and dryer.

  • Rough budget